- No Obligations
- Stop Paying Too Much For Your Contractor
- No Spam Calling
- Screened & ID Checked Contractors only!
How to Remove a Garbage Disposal: Step by Step Guide
0
 How to Remove a Garbage Disposal: Step by Step Guide
earlyexperts.net
How to Remove a Garbage Disposal: Step by Step Guide
earlyexperts.net
On average a modern garbage disposal should last anything from eight to 15 years if it is maintained correctly, and it has not had to deal with waste it’s not designed to deal with. You can seriously damage your disposal if it is not used properly. Garbage disposals are designed to cope with the biodegradable waste generated in a typical home. It’s not a garbage crusher so cannot deal with bones, plastic or metal items. There are also some foodstuffs which should be avoided, as they can, over time, reduce the efficiency of a garbage disposal, and shorten its working life.
✓ Too much grease or oil can solidify within the machine and cause clogs.
✓ It’s not a good idea to push pasta or rice through a garbage disposal, as they expand with water and can also clog the machine.
✓ Stringy vegetables, such as celery, can become caught in the blades, and overheat the motor.
✓The blades can be damaged by hard food and fruit pits.
Even if you have followed the rules for garbage disposal to the letter, then the wear and tear of working on a daily basis may mean your machine needs to be removed or replaced. There are a number of symptoms that may suggest your garbage disposal needs to be removed.
✓ It’s stopped running altogether, and makes no noise at all.
✓ It’s running slowly, and not working as efficiently as before.
✓ When it runs, it’s very noisy, or there is a humming sound coming from the machine.
✓ The garbage disposal tries to work but appears jammed, and it cannot be unclogged.
✓ It’s leaking.
If your garbage disposal is showing any or all of these symptoms, it is probably time for a change. Removing a garbage disposal, and replacing it can be a DIY job, or if you do not feel confident can be done by a qualified plumber. However, if you decided to do the work yourself, here’s a step-by-step guide.
1. Unplug it
Before doing anything, unplug the garbage disposal from the wall socket, to remove the risk of electric shocks. If your machine is hardwired, then you have to turn off the circuit breaker linked to the garbage disposal first. Once that is done, you can open up the connector box and disconnect the wires, making sure the exposed ends are covered with insulating tape and do not touch.
2. Disconnect drain trap
The first part of the removal involves disconnecting the drain trap which connects the garbage disposal unit to the drain. There will be some water and waste in the pipe, so it’s a good idea to put a container underneath to catch any spillage. Depending upon the model, these pipes can be fixed with bolts or slotted screws.
Often, if you have a dishwasher, it will also be connected to the garbage disposal. In that case, it will also have to be disconnected from the machine. A pair of pliers is usually sufficient to pull the dishwasher drain line that connects to the garbage disposal. Make sure the disconnected line is kept up, as any water left in the dishwasher may drain through the line.
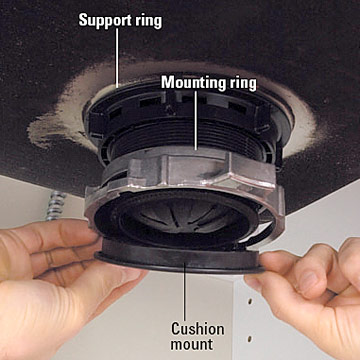
3. Unscrew the mounting ring
Now it’s time to remove the garbage disposal unit itself. There should be a mounting ring which can be unlocked by inserting a flat screwdriver and giving it a ¼ turn counterclockwise. The disposal unit should then drop away from the mounting assembly. Be ready to catch it as it can be quite heavy. The mounting assembly itself can be removed by loosening the screws, and then popping the snap ring. The rest of the mount should come away, and the top piece can be removed from inside the sink itself.
You have now successfully removed the old garbage disposal from your sink. If you are replacing it with a new unit, then follow the manufacturer’s installation instructions. They will probably match the removal instructions in reverse. However, if you do not intend to replace the garbage disposal, you will need to replace the drain so the sink can be used. Here’s how to do it.
If you do not intend to mount a new garbage disposal
With a large hole in the bottom of the sink, it is a good idea to replace the garbage disposal opening with a basket strainer. There are lots of models available, and each will come with detailed installation instructions. Make sure there is no old putty left around the opening by cleaning with a knife. Before inserting the strainer into the top of the sinkhole, wrap a ring of putty, or other waterproof locking material around the strainer.
From underneath put the rubber washer, then the mounting cup, and finally the mounting nut onto the bottom of the basket strainer. Tighten the mounting nut until the basket strainer is secure, and remove any excess putty that has squeezed from the join with the sink.
A flanged tailpiece connects the basket strainer to the drain. If you previously disconnected a dishwasher, you will need a branched tailpiece to take the dishwasher drain line. It is a simple operation to screw the tailpiece into the basket strainer. A washer to go between the two should have been supplied with the basket strainer. Once the tailpiece is in place, you can connect up the dishwasher drain line.
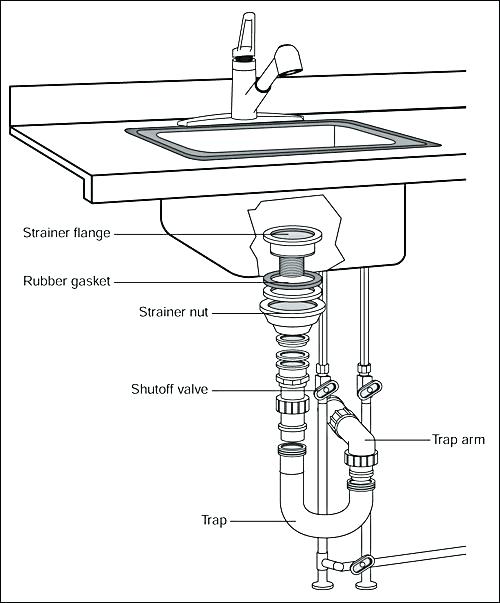
Next up is installing the continuous waste pipe. This may need to be cut to size. When fitting it needs to have a downward slope from the trap, which we will install next, to the drain. This sometimes needs to be bolted to the drain, or some other attachment. Whichever method is used make sure the correct washer are in place and are facing the direction of the wastewater flow.
The final part of the reassembly is installing the trap and arm. Getting the measurements right, so everything fits in place may require some cutting and fettling of the continuous waste pipe. Where the trap and trap arm come together, you will probably need a slip joint washer.
The connecting nuts on the pieces can be tightened by hand to make sure the spacing is correct. Allow some water through the sink to check for leaks. If there is any seepage, tighten up the connecting nuts with pliers or a strap wrench.
Most Read


Two-Car Garage Dimensions? We Break it Down for You
Apr 06, 2021