
How to Use a Drain Snake: Tools & Video Tutorial
Learn how to use a drain snake by reading our practical tips and watching a short, step-by-step video tutorial. Up to 4 free contractor quotes included.
Floods, rot, and disease might sound like something from an apocalyptic movie but actually, these are only a few of the potential outcomes a blocked and overflowing drain may cause.
Easily neglected and a nightmare when it happens, unclogging a drain can become very expensive if you aren’t sure how to unblock it yourself.
A first instinct might be to pour drain the unblocker or call for a handyman to come and do the job for you, what we want to offer in this article is a safe and cheap alternative to the panic options.
The tool this article will primarily focus on is called a drain snake. This is as the name suggests, a long winding coil that finds its way around bends and corners, through your piper to directly shift a blockage.
Our focus is the pipesnake for the simple fact that liquid drain unblocker might not seem like a panic option, this is down to it being so common to use but we want to offer a few facts, our planet is a fixed water system meaning eventually, all that goes down the waste drain eventually ends up back inside us through food and drink. Organic waste can be dissolved and treated, harsh chemicals not so much.
This is not to say the environmental impact shouldn’t also be considered, again these harsh chemical enter the local water systems and they affect wildlife that uses the waterways for home.
Finally, the solutions themselves aren’t always guaranteed to work. Often using toxic acids or other dangerous compounds these can linger and transfer to other surfaces.
The above reasons are why we write this guide, the hopes to make life easier and give a step by step guide on a subject that is often thought of as a costly, time-consuming process.
Before we delve into drain snakes and their use, we feel it is worth noting that prevention is definitely cheaper and easier than the cure. For most standard drains, prevention comes in the form of a plughole cover or filter. There are many different styles available but all have the same basic function, that is to stop hair, food, and general debris from entering the waste system. This can stop the need for cleaning or at the very least significantly increase the time frame between cleans.
The basic options available range from the soft sticky covers, like the one below, these are disposable rather than reusable, so need replacing whenever it gets too clogged up.
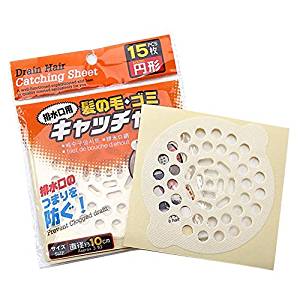
Simply peel off, throw away and replace with new. Because of the waste produced by the disposal of these products, they could be classed as less environmentally friendly than other options.
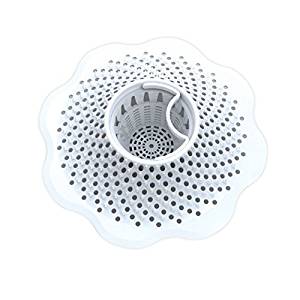
A more eco-friendly variant can be found by the linked provided below. This particular design is plastic but metal can also be found depending on what appliance the cover is for. These are great for keeping the drains clear. Once full you simply remove the filter, throw away the hair and debris, give it a quick rinse and place it back over the plug. Simple as that.
Available Options
Presuming you are beyond the stage of a filter doing its job, whether you did or didn’t use one, the pipe is blocked and action needs taking, there are three basic options available when clearing a blockage so let’s run through them.
The first option to talk about should undoubtedly be the good old fashioned plunger. This should always be the first port to call since it is the cheapest, safest, most environmentally friendly option available, also the most likely tool the average person will have laying around the home.
It may be surprising to find out that most people don’t actually know the correct way in which to use a plunger. The temptation being to immediately pick it up, place it over a plug hole or toilet and start viciously pumping. Sometime this will work depending on how far down the pipe the blockage is. If we are talking far enough inside the system that there are other drainage intakes and outlets, like sinks or guttering pipes, before the blockage, then all the work will before nothing.
Plungers work through what is known as hydraulic action. This means a void of air and liquid is used to force pressure against a blockage, thus dislodging it. If other outlets along the system give the air and liquid chance to move and escape then no pressure will be able to build up and force the blockage to move. Often this is the reason that plungers might appear not to work. The key here is to block off all other intakes and outlets before the plunger is used. This restricts airflow and allows the hydraulic pressure to form. This fact is often overlooked or not considered at all when using a plunger, so keep it in mind.
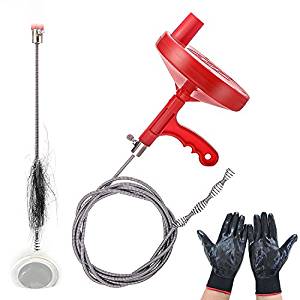
From this point on we are presuming the plunger has not worked so what next? Well, the answer is in the title for this article, the drain snake.
As described above, the drain snake is a flexible coil that gets inserted in an open-ended pipe, the flex allows for movement around corners and bends while the body is long enough to penetrate a vast distance through the pipe. This crude but effective device works its way through a pipe, hooking onto and dislodging any buildup along the way. If it hits a dead end of debris it can either break down or move the mass, thus clearing the pipe.
There are numerous types of drain snake and each has its own special function or differentiating factor for a specific job.
The basic design, however, to the most part stays the same across brand and product. This consists of a metal coil spring body with a bulb auger or similar tool on the end that is designed to chop, push or disintegrate debris as the snake moves along the pipe. The spring body offers both flex and ribbing to help with dislodging grime build up along the pipes.
A modern offering to these snakes comes in the form of a nylon insert that acts as a core. This offers extra protection to the spring-like material, extending its life and preventing kinks which is otherwise a common problem in spings.
We are going to provide a brief description and links to a few of the available options.
The most basic option, readily available for just a few dollars is the plastic-bodied, barbed hair removal tool.
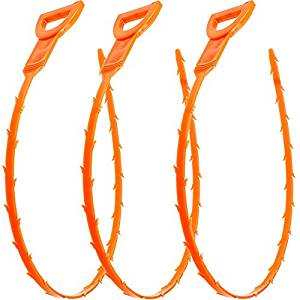
This snake usually comes advertised as a hair removal tool but in fact, can remove more than just hair. The plastic barbs are designed to pierce and grab hold of the blockage and rip it out rather than pushing it through the pipe.
For shallow blockages, this easy to use tool can be a great option since they are so cheap and simple to use with the added bonus of an easy functioning handle. Ideal for bath and showers where a blockage is more than likely located before the elbow bend.
Plastic is not without its faults, however, before use, it is recommended you check over the body and spikes for cracks, damage or signs the plastic itself has not gone brittle with age. If you use this beyond its best and it snaps in the pipe then you may end up with a bigger problem than you started out with. Especially if this occurs beyond the elbow bend as pipes may be a lot harder to reach and repair.
The next option readily available then is the coil wound, metal bodied drain snake. These come in various lengths and can actually be cut down if needed. These are a lot stronger and longer lasting than plastic, their ideal use being that for travelling the length of the sewage side of a P or U bend.
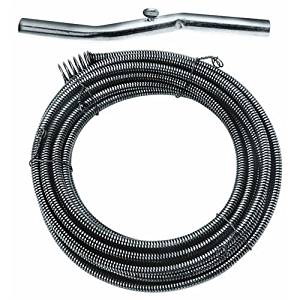
Modernly, nylon inserts are added to this for the extra protection but these augers are the better option when dealing with longer lengths of pipe.
This particular product comes with a crank handle. When a blockage or tough spot is reached, lock the wingnut and twist the handle. This will cause the spring to also turn inside the pipe, allowing it to work through the debris or maneuver corners. Once free unscrew the wingnut and feed more length.
It is worth noting a downside to this particular product, that is the material. Usually made or high carbon spring steel, this is what gives the item its strength and flex, the drawback to this can be a tendency to rust after use.
That being the case my recommendation would be that once used and cleaned, apply a light coating of oil, ideally vegetable or some other environmentally friendly oil. Apply the oil then store in a bag or box so the oil stays on the snake and cannot evaporate or drip off.
The final readily available DIY option is the modern twist drum design. This works in much the same way as the above option only with a difference of having a plastic container and handle for an easier, more sturdy grip and controlled use. The container doubles as both a storage compartment and a crank handle for turning the cable through a blockage once extended.
When considering which option to pick from amongst the many others that are available. You need to consider what type of blockage it might be, where it might be in the pipe and the size and shape of the pipe.
The metal auger snakes come in a variety of sizes, with the biggest being for large sewage pipes like toilets or drains instead of sink and shower runoffs.
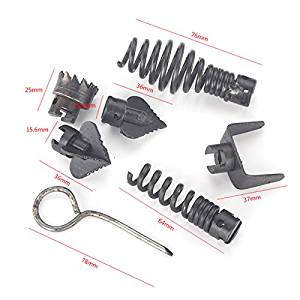
Also, consider the possibility, especially with bigger drains that a different tip that the standard bulb auger might be required. The example below offers a number of interchangeable tips, each with their own special purpose and ability. A pack of these can be purchased along with the correct snake then changed and used as needed.
Snaking the Drain
Having discussed the available tools and their use then what next? Presuming you have made the choice of what will work best for you then we need to begin the snaking process itself. All products use the same basic principles so this guide will work for all. Where technique may vary I shall say when and why.
Step 1 – Prep & Deconstruction
Fill your sink, bath, toilet, or whatever basin you’re using that the problem has stemmed from, with water. In so doing, you make sure the pipes are definitely blocked. Next, having sealed off other outlets, use the plunger.
To use a plunger, place it over the hole to form a tight seal. When that has been established then pump up and down on the handle to get the hydraulic pressure started and moving. When the pressure releases, remove the plunger to allow water to flow down then reseal the plunger and repeat. You may need to do this several times to completely clear a blockage.
Presuming the plunger has not worked or you don’t feel satisfied with the result, it’s time to begin the snake. The initial temptation might be to empty out the accumulated water, in fact, this could be your first mistake. The likelihood that a drain is so blocked that water will not drain at all is quite slim, and bailing out the water may be time-consuming and in fact, counterproductive.
If possible follow the 24 hour rule, that is to fill up and leave the water to drain slowly over however long it takes but up to a maximum of 24 hours, if the water has only moved a little to not at all then you should presume you have a very serious blockage and bail out the water before cleaning, otherwise once the elbow bend comes off, well all that water will end up on the floor. The added bonus to this is that the water will dampen and soak the blockage thus making it easier to remove when a snake is introduced.
Whether the water has soaked through the blockage or not you need the bowl clear before you start. If the 24-hour drain rule has not worked then you will need to drain what water remains in the basin. Do this before you start to unscrew any fixings.
Once cleared, there are a few items you’ll need or ideally need in place before you ultimately begin the snaking process.
The checklist goes like this:
- Rubber g
- Respirator with a biological filter
- The snake itself with a relevant tip
- A pair of pipe grips
- Large tray or bucket
- Plastic bag
- Tissue and/or disposable rag
The first stage should be to place your bucket or tray lid underneath the elbow in the pipe, any water remaining in the pipe or elbow is obviously subject to the laws of gravity, so when unscrewed and detached, the liquid and debris remaining in the pipe and bowl will spill and this is technically sewage water so best not the throw it everywhere.
Unscrewing the fitting should ideally be manageable by hand, this is thanks to the fittings being made from plastic when they were previously tightened by you or your plumber the fittings shouldn’t have been tightened with heavy tools since this can damage or break fittings, seals, and threads.
Hand tight should do it. There are a number of standard and specialist tools available but the cheapest, most readily available and least likely to cause damage to the delicate plastic fitting are the style found here below.

With either tool or hand, and your protective gloves on, you need to remove the two nuts that hold the elbow in, again be careful not to spill the water out the trap of the elbow, if there is any waste, pour away in a safe place, not the sink you’ve just removed the pipe from however, you’d be amazed how many people make this mistake. Any excess spillage from the pipe will be caught by the spill tray or bucket underneath so remember to have that in place.
Next check first the elbow and see if this is where your blockage is located, it is one of the most common areas for blockages to build up because of the design and use of the joint. If this is clear then inspect the sink or basin side. To do this look through the plug hole down the pipe, if it is too dark then an effective technique is to shine a torch up through the now open end while looking down, it will silhouette any debris in the pipe.
Should the basin side be free of obstructions then we can only presume that the blockage is further along the system, i.e. sewage side, this is where the snake now comes into its own.
Step Two- Snaking
For step two we are going to get dirty, this is where we could possibly be coming into contact with sewage waste so extra protection should be used.
A filter mask with a biological filter is ideal, this will stop any bad smells or potential bacteria coming into contact with your airways.
Plastic disposable gloves are also recommended, firstly to stop direct skin contact with bacteria but they will also help to stop you from cutting or injuring yourself when handling the metal snake.
With your mask and gloves on and the bucket or tray in place to capture spills, you need to make sure the snake is not tangled. The most frustrating scenario to be in is to have threaded the snake twenty feet into the pipe then have to drag it out because of a tangle so deal with this beforehand. Have the snake in a tidy, easy to unravel coil on the floor, when everything is set and ready then begin by loading the bulb auger into the end of the pipe.
Once inserted steadily begin to thread the snake being careful not to force it to fast, keep going until you start and feel it slow down or completely stop. When it does then you are likely coming across a bend or some sort of debris. Each type of snake will be different but there should be some sort of winged screw or locking mechanism that secures the handle to the snake’s body, allowing for it to be turned. Tighten this screw and rotating the snake will break down debris and allow the snake to continue on its journey. Should it be a bend or rough bit of pipe, this action will allow for the manoeuvre of corners.
This process should carry on ideally until you reach the end of the snake or you are confident that you are well beyond where you think the blockage could be, this will be determined when the snake becomes hard to keep feeding through. Something to be noted is that the possibility is there with the very long snakes, that you will go so far through the pipe you could make it to the mains sewer system.
Although this won’t cause any harm in itself, just keep in mind that in the unlikely event this does happen, this snake needs to come back out through your house so anything that gets caught in its coils will also come with it.
Our suggestion is to simply carry on until you either reach the end of your snake for shorter lengths like 15-25 feet. For longer, then carry on until you are confident you have cleared any obstructions then drag it out.
Now with the obstruction cleared, it’s time to retrieve the snake, sadly this is the not so pleasant part, gloves, mask, disposable rags or cloths and a plastic bag are a pretty big necessity. We will say to try and avoid using kitchen roll to clean the snake body since as it will get shredded by the spring causing a lot of mess.
While gently pulling the snake out the pipe, a foot or so at a time, clean the section off with the rag ensuring your bucket or tray is underneath to catch any excess debris. As you unthread more of the snake, make sure the excess is being safely wound into the bag for deep cleaning later on. This should be done with a scourer, soap, gloves and hot water.
Steadily bringing it out, make sure to stop every so often to further twist the snake, this will help to drag out built-up debris and make it easier to remove the snake.
Step 3- Reconstruction
Once the entire length of the snake is removed and placed in a bag, you can begin to reattach the pipework, if there are any O-rings or pipes that need cleaning or replacing then now is the ideal time doing so.
Put the pipes back in place and hand tightens the nuts. Once you are confident all is secured back together, then before you remove your bucket or tray, test the pipe to ensure the joints are sealed correctly.
Turn on the tap for a few seconds and check there are no leaks. Presuming it is okay then you need to turn on the water and start to check the flow. Make sure that the water flows and drains freely again and this will tell you if the snaking has worked or not.
This useful instruction video gives a step by step guide as well as providing a useful run through of tips and tools.
Once the snake process is completed they there may be a final stage of using chemical cleaners but I would advise caution if it isn’t completely necessary. If you decide to go ahead then quickly read through below, where I discuss a few of the available options.
Third and final option
Now we have discussed the detailed methods in which to use a snake then we are more or less finished, hopefully, at this point, your drain is clear.
If somehow a blockage does persist, or you want to give it a bit of a final clean for the safe measure before you officially declare it as job done then we still have a couple of options left that come in the form of chemical cleaners. we know we stated above about my opposition to chemicals and that still stands but as a final solution that’s cheaper than a plumber, this would be it.
Chemicals range from not so nasty, like homemade mixtures that are based around baking soda to the downright dangerous type that contain highly corrosive acids and pollutants.
Our opinion here is to start with the more forgiving variety, especially the homemade solutions using household, sometimes food safe chemicals, then work up if needed.
Conclusion
There are so many options available when it comes to the simplest of tasks like clearing a blocked drain.
A kneejerk reaction in the modern times seems to be that something so simple like a blocked drain feels like the end of the world when it happens. The immediate solution is to either grab the right cure and use it wrong or throw a lot of unnecessary money and time at a problem to get it fixed as fast as possible. This is the habit that guides like this one are trying to break by offering a happy alternative to expense and panic.
We are helping to restore a DIY mentality which in turn is helping to make people more confident in their own abilities and helping to save money in a world that seems to be getting ever more expensive.
Thanks for reading.