
DIY Guide: Installing Under Cabinet Lighting
Ever looked at your kitchen and felt it could use better lighting? I’ve been there. Did you know that under cabinet lighting can significantly improve visibility and add a striking effect to your cooking space? This detailed guide shares everything you need to embark on this illuminating DIY project.
Let’s light up your kitchen!
Key Takeaways
- Under cabinet lighting enhances the aesthetic appeal and functionality of your kitchen by providing focused task illumination on countertops.
- LED light strips and self – adhesive lighting are popular options for easy installation and energy efficiency.
- Before installing under cabinet lighting, be sure to turn off the power supply, prepare the wall and cabinet surfaces, create a clean work space, drill holes for wires, attach the lights securely using screws or adhesive strips, wire the lights following safety codes and regulations, install the switch in a suitable spot with proper connections.
The Importance of Under Cabinet Lighting
Under cabinet lighting plays a crucial role in enhancing the aesthetic appeal of your kitchen and improving functionality. It provides focused task illumination on countertops, making it easier to handle kitchen utensils and prepare meals efficiently.
This specific type of light fixture is important for creating a warm, cozy ambience, particularly in kitchens with inadequate natural light sources.
Moreover, under cabinet lighting helps ensure safety while handling sharp objects or hot cookware by providing clear visibility even during nighttime cooking sessions. It consumes less energy compared to overhead lights if you choose LED or low-voltage xenon bulbs as lighting options.
Not only does this reduce your electricity bill but also contributes towards being environmentally friendly given their longer lifespan and cooler burning than other bulb types. Installation can be done without causing visible damage to the walls or cabinets – an additional advantage for those who are meticulous about maintaining their interior decor intact.
Necessary Tools and Materials
To install under cabinet lighting, you will need several tools including a cordless drill, hacksaw, jigsaw, non-contact voltage tester, and wire stripper/cutter. Additionally, you will need materials such as spade bits, metal flex cable, plastic-sheathed cable, cable clamps, fish tape, and junction boxes.
Tools Required for Installation
Starting your DIY project of installing under cabinet lighting necessitates having the right tools at hand. Here’s a list of what you’ll need:
- Cordless drill: This tool is essential for drilling holes required for routing wires.
- Hacksaw and jigsaw: These are necessary for cutting right-sized spots in cabinets or walls.
- Non-contact voltage tester: I use this to ensure the power is off before starting the installation to avoid electrical shock.
- Wire stripper/cutter: As its name suggests, this tool is useful for cutting and stripping wires during the wiring process.
- Spade bit: I find this handy when drilling larger holes for the wires.
Materials Required for Installation
Gathering all necessary materials before the installation ensures a smooth and successful process. Having the right supplies at your fingertips can make your DIY project a breeze. Here’s what you’ll need:
- Spade Bit: This tool will help in drilling holes for wires.
- Metal Flex Cable: A sturdy conduit to protect and route the electrical wiring.
- Plastic-Sheathed Cable: An insulated cable, best suited for indoor wiring tasks.
- Cable Clamps: Useful for firmly fastening your cables and keeping them tidy.
- Fish Tape: This will guide and pull cables through difficult or tight spaces.
- Flex Connectors: These attach flex cable to an outlet box or enclosure.
- Junction Box: Secures wire connections and prevents electric shocks.
- Remodeling Switch Box: Houses the switch that controls your under cabinet lighting.
- Undercabinet Lights: Choose based on lighting type, finish, dampness rating, dimensions etc. LED light strips are effective as they provide task illumination and can even be used for above cabinet lighting too!
- Wire Nuts: Essential for connecting two or more electrical wires together securely.
Selecting the Right Under Cabinet Lighting
When selecting the right under cabinet lighting, consider options such as LED light strips or self-adhesive lighting for easy installation and energy efficiency.
LED Light Strips
I love using LED light strips for under cabinet lighting because they offer a sleek and modern look while providing excellent illumination. They are easy to install and energy-efficient, making them a popular choice among homeowners.
You can easily adhere the strip lights to the inside edge of your upper cabinets, creating a seamless and stylish lighting solution for your kitchen. With LED light strips, you’ll have bright, efficient, and beautiful lighting in your kitchen space.
Self-Adhesive Lighting
Self-adhesive lighting is a fantastic option for installing under-cabinet lights. It offers flexibility in installation with the choice of either screw or adhesive strip mounting. This means you can easily adjust and move the lights as needed without any permanent fixtures.
Wire straps are included with self-adhesive lighting, allowing you to secure and hide the electrical wires for a clean and organized look. Another convenient feature is integrated IR sensors, which provide easy on and off control without requiring additional switches.
If you’re looking for high-quality self-adhesive lighting, consider HitLights LED strip lights. They are recommended for their desirable color temperature, brightness, and energy efficiency.
Safety Precautions Before Installation
Before beginning the installation process, it is crucial to prioritize safety by following a few important precautions.
Turning Off Power
To ensure safety during the installation process, it is essential to turn off the power supply before installing under cabinet lighting. This precautionary measure helps prevent any electrical accidents or shocks.
Before working with any electrical wiring or fixtures, always make sure to locate and switch off the correct circuit breaker that controls the power to your kitchen. Use a non-contact voltage tester to double-check that there is no live current flowing through the wires before proceeding with the installation.
Taking these steps will help ensure a safe and successful installation of your under cabinet lighting.
Preparing the Wall and Cabinet
First, I make sure to protect the plastic-sheathed cable behind the cabinets to prevent any damage. To provide extra protection from pots and pans, I use flexible steel conduit, also known as “flex.” Next, I locate a nearby power source that is not connected to dedicated circuits for the under cabinet lighting.
This could be an outlet or a light switch box. Once that is done, I prepare both the wall and cabinet by ensuring they are clean and free of any debris. Finally, I measure and mark where the lights will be installed on the underside of the cabinets before moving on to the next step in the installation process.
Step-by-Step Installation Guide
To install under cabinet lighting, start by creating a clean work space and drilling holes for the wires. Then, attach the lights and wire them according to the instructions. Install the switch and run the cable inside and under the cabinet.
Finally, hide cords and make final connections for a seamless finish.
Create a Clean Work Space
Before starting the installation process of under cabinet lighting, it is crucial to create a clean work space. This entails clearing any clutter or objects from the area where you will be working.
By doing so, you can ensure an organized and efficient installation process. Additionally, a clean work space helps prevent accidents or damage to the under cabinet lighting during installation.
It also allows for easier access to tools and materials needed for the job. Ultimately, having a clean work space not only makes the installation process smoother but also provides a neat and professional appearance to the finished project.
Drill Holes for Wires
Drilling holes is a crucial step in the installation process of under cabinet lighting. These holes will serve as pathways for the wires that connect the lights. Plastic-sheathed cable should be used to protect the wires, especially in areas where they may be subject to damage or abuse, such as behind cabinets.
If necessary, flexible steel conduit can also be utilized to provide extra protection against potential harm from pots and pans. After drilling the holes, it’s important to route the wires through them and leave them hanging temporarily until the lights are ready to be mounted.
The method of mounting will depend on personal preference, whether using screws or adhesive strips for secure attachment.
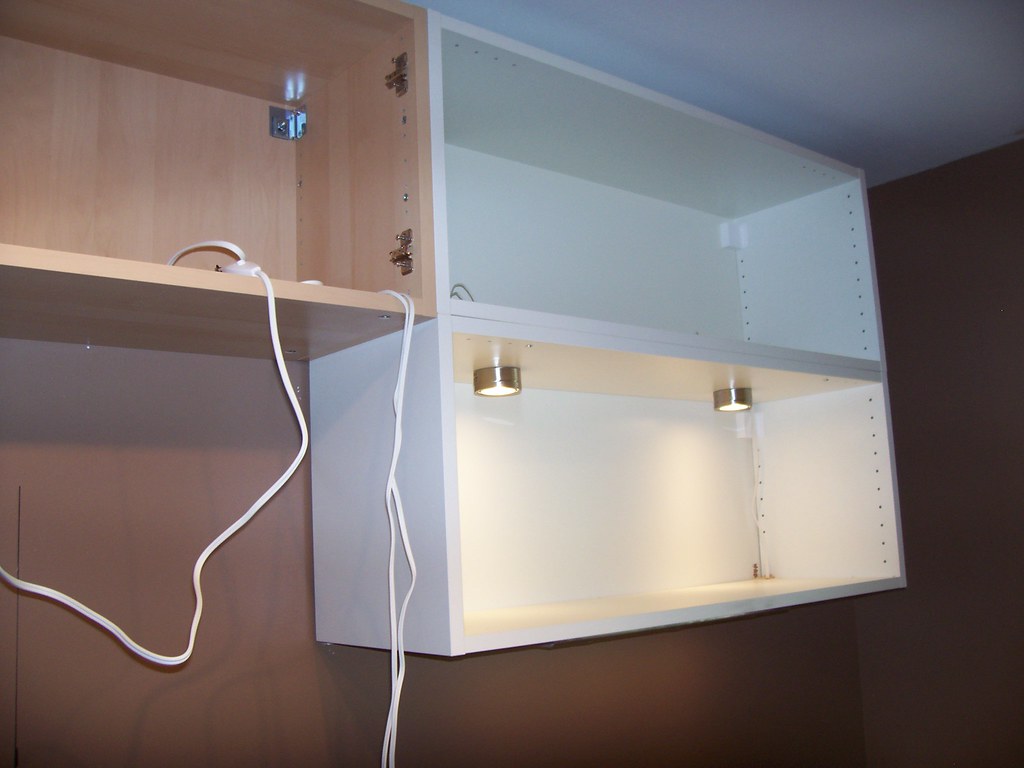
Attach the Lights
I carefully positioned the lights under the cabinets, ensuring they were aligned properly. Using mounting screws, I securely attached each light fixture to the underside of the cabinet.
This step is crucial in providing the desired task illumination and accent lighting for your kitchen. Make sure to follow the manufacturer’s instructions for proper installation and secure attachment.
By attaching the lights effectively, you can achieve a well-lit workspace that enhances both functionality and aesthetics in your kitchen.
Wire the Lights
To wire the lights for your under cabinet lighting installation, you will need to follow these steps. First, gather all the necessary materials, including flexible steel conduit (also known as “flex”), cable clamps, and wire straps.
Measure and cut the flex to fit behind your cabinets, ensuring it is long enough to reach a power source. Next, secure the flex with cable clamps to protect the electrical wires from pots and pans.
Then, using wire straps provided in your kit, hide the wires along the back of your cabinets for a cleaner look. Finally, connect the wires to a power source or junction box following local safety codes and regulations.
When wiring under cabinet lights yourself, always make sure to turn off power before starting any electrical work. This will help prevent accidents or electrocution while handling live wires.
Install the Switch
To install the switch for your under cabinet lighting, follow these steps. First, locate a suitable spot on the wall or cabinet where you want to mount the switch. Use a pencil to mark the position and ensure it is easily accessible.
Next, turn off the power at the circuit breaker to avoid any electrical hazards. Take your remodeling switch box and attach it securely to the marked spot using screws or nails. Make sure it is level and stable before proceeding.
After that, connect the wiring from your under cabinet lights to the switch box. Strip about 3/4 inch of insulation from each wire end using wire strippers. Then, twist together matching colored wires (e.g., black with black) and secure them with wire nuts.
Once all connections are made, carefully tuck the wires into the switch box while avoiding any excessive bending or stretching.
Lastly, restore power by flipping on the circuit breaker dedicated to your under cabinet lighting project. Test out your new setup by toggling the switch on and off; if everything works smoothly, congratulations! You have successfully installed a functioning switch for your under cabinet lights.
Run Cable Inside and Under the Cabinet
To ensure a clean and professional installation, it is important to run the cable inside and under the cabinet. This step involves carefully routing the cable through concealed channels to hide it from view.
By doing this, you create a neat appearance while also protecting the wiring from potential damage. Take care to secure the cables using wire straps provided with your under cabinet lighting kit, as this helps to keep them hidden and prevents them from dangling or becoming tangled.
Properly running the cable inside and under the cabinet ensures that your under cabinet lighting system is both functional and aesthetically pleasing.
Tips for Hiding Cords and Making Final Connections
To achieve a clean and seamless look for your under cabinet lighting, it’s important to hide the cords and make final connections properly. Here are some tips to help you accomplish that.
Firstly, consider using cable clamps or adhesive clips to secure the cords neatly along the underside of the cabinets. This will prevent them from hanging down and create a more polished appearance.
You can also run the cords behind appliances or furniture to keep them out of sight.
Another option is to use flexible steel conduit to protect the cords from any potential damage caused by pots, pans, or other kitchen utensils. This conduit can be easily installed and painted to match your cabinet color, ensuring that it blends seamlessly with your kitchen decor.
When making final connections, always make sure to follow safety precautions such as turning off power before handling any electrical components. Use wire nuts or connectors recommended by the manufacturer for secure connections, and double-check all connections with a voltage tester to ensure they are working properly.
By following these tips, you can hide unsightly cords and achieve a professional-looking finish for your under cabinet lighting installation.
Conclusion
Installing under cabinet lighting can greatly enhance the functionality and aesthetic appeal of your kitchen. With the right tools, materials, and a step-by-step guide, you can easily achieve this DIY project.
Remember to prioritize safety precautions when working with electricity, and don’t hesitate to seek professional help if needed. Enjoy the benefits of improved task lighting and add a touch of sophistication to your kitchen space.
FAQs
1. What tools do I need to install under cabinet lighting?
To install under cabinet lighting, you will typically need a power drill, screws, wire strippers, electrical tape, a screwdriver, and the lighting kit itself.
2. Can I install under cabinet lighting without any electrical experience?
While it is possible for someone without electrical experience to install under cabinet lighting, it is recommended to consult a professional electrician if you are unsure or uncomfortable working with electricity.
3. How do I determine the best placement for my under cabinet lights?
The placement of your under cabinet lights will depend on factors such as the size of your cabinets and personal preference. Generally, lights should be evenly spaced along the underside of each cabinet, focusing on areas where you need adequate task lighting.
4. Are there different types of under cabinet lighting available?
Yes, there are several options available for under cabinet lighting including LED strips or puck lights. Each option has its advantages and disadvantages in terms of brightness, energy efficiency, and ease of installation. It’s important to research and choose the option that best suits your needs and budget.