- No Obligations
- Stop Paying Too Much For Your Contractor
- No Spam Calling
- Screened & ID Checked Contractors only!
How to Read a Tape Measure Efficiently and Correctly
1
 How to Read a Tape Measure Efficiently and Correctly
earlyexperts.net
How to Read a Tape Measure Efficiently and Correctly
earlyexperts.net
It doesn’t matter if you are a craftsman or a weekend DIYer, a project is sure to go wrong if you don’t get the measurements right. That’s why you’ll find a tape measure in every tool kit, it’s become one of the most useful and most misread devices on the plant. The tape measure may appear to be simple on the surface, but it can cause no end of trouble for some people, not to mention the heartache when a project fails.
We have to thank William Bangs of Connecticut for this handy device, as he was the man who patented the first tape measure in 1864. Over the years it was refined, but it was not until the 1920s that the first metal tape measures we know today began to appear. The concave metal gives rigidity which means the measure can stand straight up to six feet.
When you go to the local home improvement store, and see the vast array of tape measures on display, you’re probably going to say that they are all alike.
Unfortunately, there is no universal standard of measurement, so tape measures around the world are made with two scales of measurement, Imperial, which is split into feet and inches, and Metric, made up of millimeters, centimeters, and meters. In some countries such as the UK, tape measures have both Imperial and Metric measurement markings. Until recently in the US, for example, all tape measures were in Imperial units, however the dual standard option is becoming more widely available.
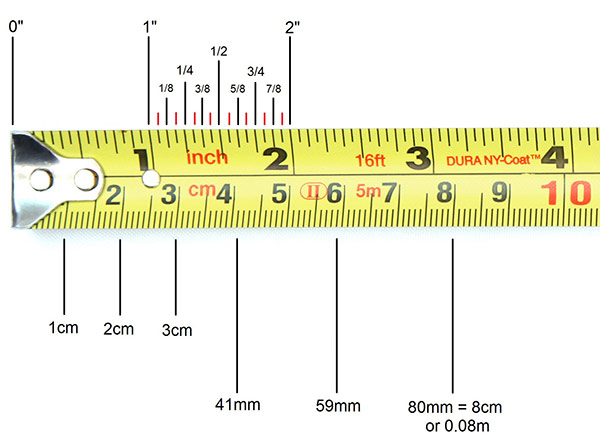
How to read a Metric only measure
Metric measurement is the simplest system of use. Building and construction practice calls for all measurements to be made in millimeters (mm). These are the smallest unit on the tape measure scale, and are also marked with the smalles hash mark along the edge. As they are so small, they are generally not individually numbered on tape measures. Ten millimeters make up a centimeter (cm) and these are marked with a number, and a bigger hash mark. Every tenth centimeter is highlighted, so they can be easily picked out. A hundred centimeters make up a meter (m), which is again clearly marked on a tape measure with a hash mark that will extend across the width.
How to read an Imperial only measure
Imperial measurement can be a bit tricky, especially or those who have been brought up using Metric measurement. The Imperial measure used extensively in the US, is split to feet, inches and fractions of an inch. The smallest unit marked is the 1/16th of an inch. The next is the 1/8th of an inch with a slightly longer hash mark. Next up is the ¼ inch marking. These are longer again, and 2/8ths, 4/8ths, and 6/8ths are marked as quarter inches. The ½ inch is marked with a yet longer hash, and then each inch is marked with a hash that runs across the width of the measure, and a number. As we know, 12 inches make up a foot, and these are marked with 1F, 2F, 3F, and so on. Sometimes you will find that on one edge that after the foot marker, the inches will increase again by single digits to reach 12 for a the next foot. On the other edge the inches will keep numbering incrementally, so 1ft 2 inches will register as 14 inches, and so on. At three feet, for example, it would measure 36 inches.
There some other markings, which appear particularly on tape measures sold in the United States. As there is a standard spacing for wall studs, tape measures in the US have an extra red hash mark every 16 inches to make measuring for construction more convenient.
What about the funny hook at the end?
You might be one of those people who just think the hook at the end of the tape measure is so you can easily roll the end of the reel. Well, it’s a much more sophisticated than meets the eye. The hook is called the ‘tang’, and is attached to the blade of the tape measure using a couple of rivets. However, if you have noticed the tang is not held in a permanent position, and floats at the end with a little give. It can move in and out very slightly. This little piece of shaped metal, makes measuring an internal measurement just as easy as taking an external. By pushing the tang up to an internal edge it butts up tight to the end of the tape measure blade to give an accurate reading. When taking an external measurement the tang slips over the object to be measured, this both holds the tape measure in place, and compensates for the thickness of the tang to give an accurate measurement.
Safety Tips
All modern tape measures are spring loaded, and will automatically retract into the holder once the blade has been unlocked. Be careful to control the blade and tang as it returns, if not it can be highly dangerous with the blade easily cutting an exposed finger, or the hook wildly flailing. Manufacturers have started to recommend people wear safety glasses when working with a tape measure for this reason.
Things to remember when using a tape measure
Anyone with experience of working on projects will tell you to measure twice, and cut once. If you want to be extra certain, then measure three times, and cut once. Measuring and measuring again will make sure the cut is accurate and precise.
Most Read


Find Out How to Identify Poison Oak
Apr 06, 2021

What is Engineered Hardwood & What Are the Pros?
Jun 08, 2018