- No Obligations
- Stop Paying Too Much For Your Contractor
- No Spam Calling
- Screened & ID Checked Contractors only!
How to Repair a Slow Flushing Toilet
0
 How to Repair a Slow Flushing Toilet
earlyexperts.net
How to Repair a Slow Flushing Toilet
earlyexperts.net
Like watching water boil, following the spin of a slow flushing toilet can be tortuous. This is especially true in situations that beg for a quick courtesy flush and good strong suction to dispose of the evidence indefinitely.
Your slow toilette can be caused by a variety of factors, and while some prove to be more dire than others, most can be fixed pretty simply and without the expense of a licensed professional.
In this article, we outline the most common toilette mishaps contributing to the never-ending flush and and a step by step guide for how to respond. Follow this guide, and not merely for speed’s sake, but to improve the overall functionality of your bathroom plumbing.
Toilets 101
Toilets are pretty simple technology. Still, for many of us, the process by which the porcelain throne works its magic is one we are unfamiliar with.This is mostly because the average joe doesn’t really want to get up in there to see how things work!
Here is the simple version: the tank at the back of the toilet is filled with clean water. When you flush, a plunger attached to the lever is lifted letting that clean water flow down through the bowl via gravity, taking all the yucky stuff with it.
With that basic understanding in mind, there are really only two possible source problems when it comes to a seriously slow toilet.
Either the bowl is not filling quickly enough or the drain is not letting water pass freely.
Clog in the Wheel
✓ If it is the drain that is standing in the way of you and a strong, speedy flush, it likely means you have a clogged drain.
✓ For this, simply unclogging the toilet with a plunger, snake, or chemical agent like Drano will do the trick.

✓ If you do all of these things, and there is still an issue both flushing and filling, you may have a tank problem.
Tank Attention
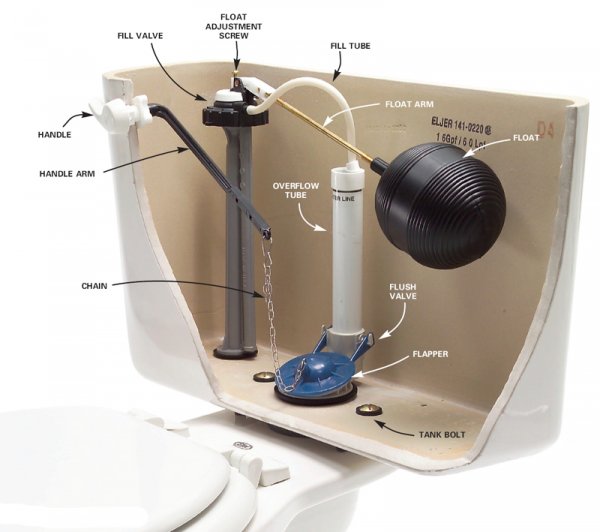
✓ Pop off the lid on the back side of the toilet and see where the water sits. Make sure to be careful when handling the lid: it is heavy and somewhat fragile.
✓ There is a chain that connects the flushing handle to a rubber piece that plugs the valve at the bottom of the tank called a flapper. This connection is completed via a thin plastic arm that juts off of the flushing handle.
✓ The chain should be taught enough so that when the handle is pressed the flapper completely lifts from the valve at the bottom of the tank. At the same time, there should be enough slack so that it sits flush and plugs any water from leaking out of the tank.
✓ If this is happening, you will hear your toilet running long after it has been flushed.
✓ When you flush, the flapper should stay open for a few seconds – enough time for the water in the tank to rush downward with enough force to wash the contents of the bowl down the main drain.
✓ If you notice your the flapper is not lifting for a long enough duration of time or that it is not plugging the drain completely when the handle is not pressed, try toying with the length of the chain.
Flush the System
If the chain to flapper system is sound and normal drain clearing methods have failed, there is another process that can be used to clear deposits of minerals and other elements capable of creating micro clogs. These can exist both in the main drain and in the overflow pipe, located in the tank.
✓ First, pour a gallon or so of hot water into the bowl. Let the water sit in the bowl. It will eventually work its way down to the bottom of the tank and hopefully loosen up anything casing the walls of the pipe that may be slowing the flush.
✓ Next, pour drain cleaner into the toilet. Be cautious of the type of drain cleaner you purchase and read the instructions carefully as the way different products work can vary. For instance, some may require time to sit in the bowl, while others call for immediate flushing.
✓ Find the overflow pipe in the toilets tank. This is the upright pipe with a thin tube running through it. Pour a small amount of dishwashing soap into the overflow pipe. Do not use any more than a tablespoon. This will act as a mineral softener, but certainly if you have access to a product made specifically for calcium removal, you may use that instead.
✓ Let the toilet sit for 10 minutes so that the dishwashing soap or calcium remover can drip down the pipe, hopefully taking all build up with it.
✓ Once the time has passed, flush the toilet, sending the drain cleaner and dishwashing soap through the entire toilet system.
The Last Option
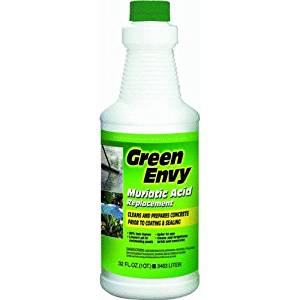
If else fails, there is one last option you can try. Unfortunately, it requires muriatic acid, a highly corrosive and potentially hazardous chemical if not used carefully.
With that said, it is vital that you take the necessary precautions when employing muriatic including gloves, eye mask, an apron, and rubber boots.
It is also a good idea to go above and beyond with regards to ventilation. Placing a fan in the window to pull the air out of the room helps keep the muriatic fumes from sitting heavy in the air to be breathed in consistently.
✓ To get started with the acid flush, turn the water off by closing the valve at the back of the toilet, then flush the toilet. This will drain all the water from the bowl and will prevent it from refilling.
✓ Any leftover water should be absorbed with a sponge or a towel.
✓ Next, take off the tank cover, careful not to drop it. Using a plastic funnel, pour the acid down the overflow tube. It is vital that a plastic funnel is used over metal as muriatic will corrode metal.
✓ Your acid solution should be a heavily diluted mix- probably close to 5:1 water to acid. Pour the solution fast so that water flows through the holes in the toilet bowl rim but careful not to allow the bowl to overflow.
✓ Whatever is left of your solution can be poured into the bowl itself.
✓ Use a piece of plastic wrap over the bowl and tank openings to seal the acid solution in so that it can really get to work. It will also keep the fumes from flowing through your home.
✓ With acid, you will want to wait 24 hours before turning the water back on and allowing your family or guests to use the toilet. Take necessary, sensible precautions regarding children and pets so that no one accidentally gets hurt near the acid soaked toilet.
✓ After a day has passed, remove the plastic wrap, turn the water back on, and give your toilet a few flushes.
Conclusion
Ultimately, there are only a few reasons why your toilet’s flushing would slow dramatically. Simply put, there are clogs and mechanical issues, and with toilets, mechanical issues are actually the lesser of two evils.
Our advice would be to to follow the order presented in the guide, checking for small, easily freed up clogs first, then the gear in the back of the tank.
If neither solution proves fruitful, you can start to plan for more thorough unclogging processes. Regardless, this article should prove helpful in getting your flushing system back up to speed.
Most Read

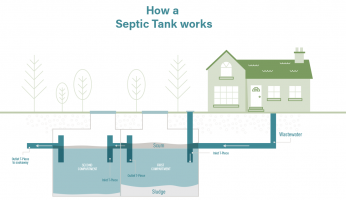
This is How a Septic Tank Works
Apr 06, 2021

Our 5 Favorite Diffused Light Lamps in 2024!
Apr 06, 2021