
- No Obligations
- Stop Paying Too Much For Your Contractor
- No Spam Calling
- Screened & ID Checked Contractors only!
How To Use A Wood Router Guide in 2024
Wood routers are great portable power tools that are used in almost every wood working project. This means that the wood router is a tool intended to use for diverse wood working projects. Wood working projects can vary from decorative to functionality intended projects around your home.
So how to use a wood router?
What can you do with a wood router? Just look around and in your house. Picture frames for example. Kitchen cabinets, desks, edges. You can also be creative and cut multiple holes in wood in order to create more decorative woodwork. And not just woodwork, the wood router is an excellent tool to use for cutting and trimming plastic, metal and laminates.
The most basic and primary use of a wood router is cutting holes in wood or “routing out”, to hollow out a hole in a piece of wood, metal or plastic while still producing finished edges, cutaways, curved contours and precisely measured holes.
Wood routers are the ultimate go-to tool of every craftsman. In this article you’ll find out about the basics of using a wood router and some of the hacks that craftsmen are using to protect themselves, their router and how they manage to create a beautiful piece of woodwork.
Before you start
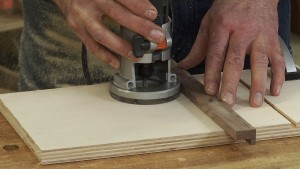
The first step you need to do is to start loose the collet by turning the collet nut anti-clockwise and insert the router bit you want to use. Then start installing the bit by tightening the collet nut clockwise. But remember to not over tighten the collet. After that, turn the router switch on.
Test it on a piece of wood to make sure everything is working as it should. After testing, make any adjustment if needed. Start routing the wood moving the router from right to left.
Secure working materials
When you’re routing, the last thing you’ll want to do is chasing the material around your worktable. The material needs to be secured on the bench. Use a router mat which provides an excellent non-skid surface. With your project on the mat you can work around all four edges without interference. You can find router mats at home centers and woodworking specialty stores.
Protect yourself before you start working

First thing, your eyes. Second, your ears too! Routers are loud enough to cause permanent damage to your hearing if you’re not protected. And you should, of course, as a standard protection procedure always wear eye protection when using tools. Safety is the main consideration when using a router as the tool cuts with an un-guarded, high speed rotating blade. Preparation before use is essential. Always make sure the wood you are working on is securely fixed in place before you start routing. Unsecured items can move hence damaging your work and potentially harming you as well.
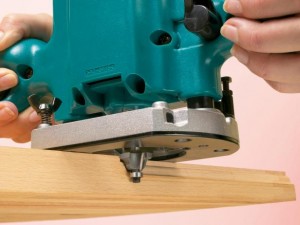
Use a router table
Wood router tables can be used with medium and larger sized plunge and fixed based routers. Router tables vary in sizes from stand-alone to bench-top.
The router is mounted upside down on a special plate that fits into a hole cut into a table top. Otherwise, it operates the same. The advantage of this is that it makes more accurate cuts and expands the use of a router.
Router Bits
The most important part of the wood router are its router bits. Without them, the router is basically just a motor that rotates. But what kinds of bits should you buy for your router (in case they’re not included in the router package)?
When you purchase router bits, you should keep an eye on the profile of the bits (pictured below).
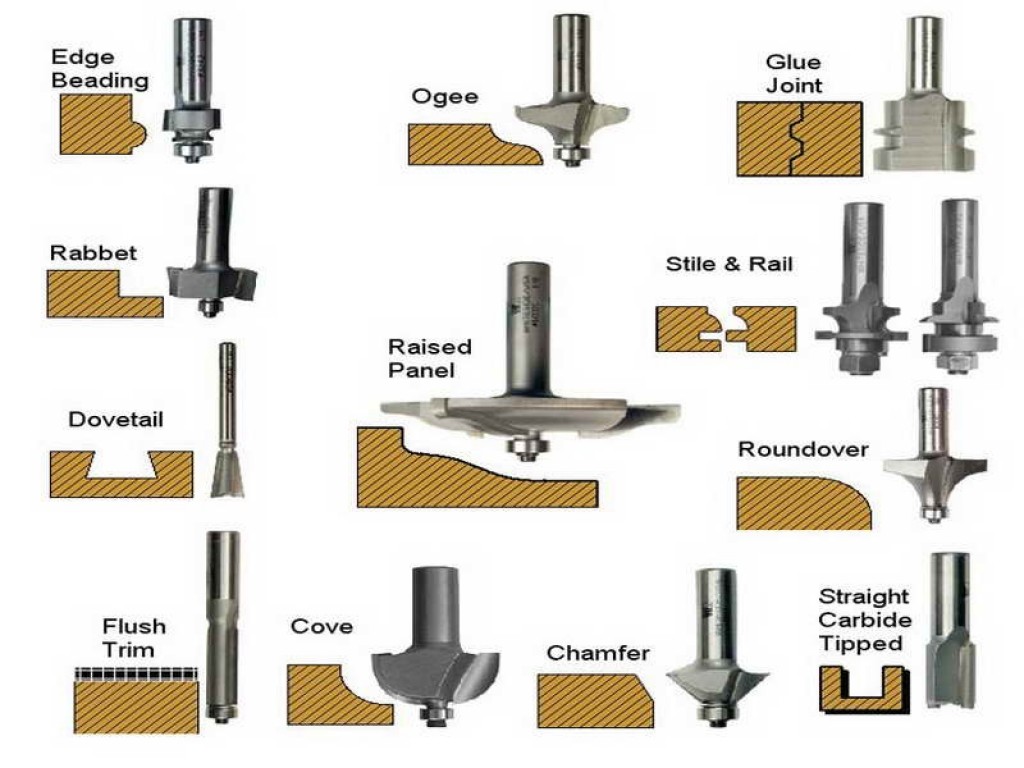 The profile of the bit is actually presenting the shape of the cutting that you’ll get with using a particular router bit.
- Straight bits make cuts straight into a material to form a groove or dado (groove across the wood grain) or to hollow out an area for a mortise or inlay. Straight router bits come in a variety of diameters and lengths.
- Rabbeting bits are designed specifically for one purpose, to cut a rabbet (shoulder) in the edge of the woodwork, and are often used to join pieces. They can be purchased in a set that includes bearings of different diameters, allowing a single bit to produce rabbets of different sizes.
- Flush-trim bits are used to trim the edges of material flush with the edge of another. They usually are guided by a pilot bearing that’s the same diameter as the cutter. The bearing may be at the tip of the bit or at the base.
- Chamfer bits cut a bevel of a particular angle to make the decoration of the edges easier of a surface. They also can create the beveled edges needed to join multi-sided constructions.
- Edge-forming bits are most often use to cut a decorative edge. Many edge-forming bits include a pilot bearing. In most cases, these bits are used for final decoration of a project where edges have already been established and can serve as guides for the bit.
- Specialized bits. The specialized bits are used for specific tasks. Most commonly used specialized bits are molding bits, which incorporate multiple edge-forming profiles into a single bit; stile-and-rail bits, which are used to shape the frame pieces in frame-and-panel constructions such as cabinet doors; and raised-panel bits, which shape the edges of a door panel to fit into the corresponding slot in the frame’s stiles and rails. These bits are large and can be used safely only in a table-mounted router. Other specialized bits include dovetail bits, drawer-lock bits, finger-joint bits and lock-miter bits.
Installing the router’s bits
For safety and proper use of the router, the bits have to be securely installed into the router’s collet. If the installation is not done properly it can cause excessive chatter and it is very likely that the bits will break when you’ll start using them.
Check your bits to make sure they are clean and most importantly, check if they’re sharp. If the bit is dull, chipped, excessively burned or has any other defect, it should be sharpened or replaced before use. Insert the bit until the shank reaches the bottom of the collet, then ease it out about 1/8 – 1/4″ before tightening the collet. When the bit is tightened, there should be no less than a 3/4″ length of the shank in the collet. If your bit has a shank that is too short to ensure 3/4″ is encased within the collet, then the bit should be replaced.
Take your time while working with the router
The cutting bit of a router rotates clockwise. For this reason it is important to hold the router firmly and router the piece from left to right, so that essentially the wood being cut is being fed into the cutting bit. If the cut is being made along the grain it should be effortless and smooth. When a cut is made and cuts across the grain, place a piece of scrap wood at the end of the wood so that it does not blow-out (splitting of wood at the end of the grain). Unless absolutely necessary, never router wood from right to left with the cutting bit rotating clockwise. This will force the router to “run” along the wood and it is very easy to lose control and very dangerous.
Start cutting shallow
When beginning to work with a piece of wood, begin by making a series of several shallow cuts. This will keep the wood from splintering and allow for greater control of the router. Making several shallow cuts will also compensate for inadvertent gouges made into the wood by the router. Sometimes this occurs because of knots or uneven pressure on the router. Making a final cut, slightly deeper than the cut where the gouge appeared, will seamlessly remove the gouge or any burn marks caused by the router.
Avoid wood splintering
The first thing to keep in mind is to use really sharp and top quality bits. We say top quality because cheaper bits will likely have cheaper carbides, meaning that the bit may not cut as cleanly as a better bit would. This doesn’t mean that cheaper bits will not do the job too, you just need to know how to pick them and find them online. To give you the best results, always purchase the best bit you can reasonably afford.
When cutting woods prone to chipping or splintering, you’ll likely do much better if you route with the grain rather than against it. This poses a bit of a problem when you need to route end-grain. Start cutting the ends first. Any tear-out on the edges will be cleaned up when you cut the side edges with the grain afterward.
If you find that routing the entire profile that in one pass of the router causes splinters, try making a few passes removing only a little bit of stock at a time. Your bit will be much less likely to grab and tear if it has less to grab onto.
The speed at which you pass the router bit through the wood is important as well. You want to make a smooth that isn’t faster than the bit can comfortably cut, but isn’t so slow it causes burning.
Reduce the router’s tear-out
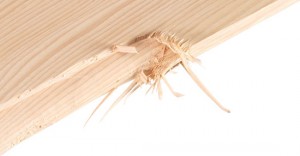
Every experienced woodworker expects the possibility of a tear-out. Chunks of the wood is significantly ripped away from the board instead of being cut smoothly. This can occur at any point of woodworking, but most often tear-out occurs on the corners right where the bit grabs the end grain and splits it along the grain. The woodwork will look ugly afterwards. But there are solutions to this problem too, with the proper use and implementation of course.
As a standard, use sharp and clean bits. Having the cutting edges as sharp as possible is not only safer, but it helps you produce better results as a woodworker. This is certainly the case when using router bits. Keeping the bits sharp and as free of pitch as possible will allow the bit to cut cleanly. If the bit is dull or laden with pitch, it will tend to grab and tear rather than making a precise cut.
It’s best to always adjust the router bit speed to be appropriate to the size of the bit. The larger the diameter of the bit, the slower the speed that the bit should be used. Adjusting the speed appropriately will keep the bit cutting cleanly and will help in reducing the heat build-up and burning.
Other way to help reduce tear-outs on woodwork’s corners is to position a piece of stock (if possible the same thickness as the workpiece) at the end of the edge that is being routed. The bit will then keep cutting into this sacrificial block, not allowing the bit to grab the end grain. This method is most often employed when routing on a router table, but can be used when hand routing by clamping the sacrificial board in place next to the workpiece.
Go in the right direction when cutting
You got to move in with the outlined direction on your wood in order to safely use your wood router. When routing the outside edge of a board, you should go counterclockwise. When routing the inside edge of a frame, move in a clockwise direction. Going in the correct direction prevents the router from climb cutting and getting away from you.
Make sure to start on the right spot
If you’re planning to rout all four edges of a board, it’s important to make the cuts in the right sequence. Start on the end grain. As the bit exits the end grain, it may slightly chip the adjacent edge. When you rout that edge you’ll automatically clean up any chipping.